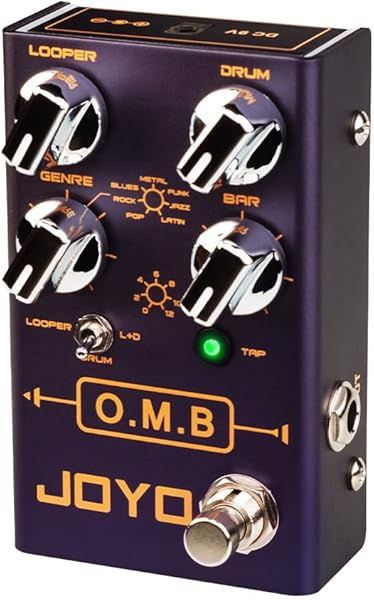
A looper pedal records a short audio passage and plays it back on a continuous loop while you play a second part over the top. Press the footswitch once to start recording, press again to stop and trigger immediate playback, then play freely over your own loop. Most loopers support overdubbing: press the footswitch a third time while the loop plays, and anything you play is added to the recording. The result is a one-person band — rhythm layer, bassline, lead melody, all in real time with no backing track needed.
Looper pedals are used by touring professionals (Ed Sheeran, KT Tunstall) and bedroom practice rigs alike. For beginners, a looper accelerates ear training and timing in ways that metronome-only practice cannot — you hear immediately when a loop does not feel right, training your internal sense of rhythm faster than any external feedback. For advanced players, a looper unlocks the ability to build multi-layered soundscapes live without a backing track.
What a Looper Pedal Actually Does
Understanding the signal flow makes a looper clear:
- Your guitar signal enters the looper normally.
- When you press the footswitch to start recording, the looper captures everything your guitar outputs.
- When you press again, recording stops and the captured audio begins playing back continuously.
- The looper outputs both the live guitar signal AND the recorded loop simultaneously.
- Pressing the footswitch again (on most models) enters overdub mode — new playing layers on top permanently.
Three core controls found on virtually every looper:
- Record/Overdub/Play footswitch: One press to record, one press to play, one press to overdub.
- Stop footswitch (or holding the main switch): Stops playback entirely.
- Undo/Redo: Removes the last overdub layer without erasing the whole loop.
Loop length: Most loopers record a loop of whatever length you play between the first and second footswitch press. Play a 4-bar chord pattern and press stop at the end of bar 4 — you now have a 4-bar loop. Timing the footswitch press precisely at the downbeat is the single most critical skill for clean loops.
Setting Up Your Looper: Signal Chain and Connections
Standard placement — end of chain (most common):
Guitar → Tuner → Distortion → Modulation → Delay → Reverb → Looper → Amp
Placing the looper at the end means it records your fully processed sound — reverb, delay, and distortion are all baked into the loop. When you overdub, each layer can have different effects settings, which is musically flexible.
In the amp's effects loop (advanced): If your amp has an effects loop (send/return on the back panel), you can place the looper there. Each loop layer then runs through the amp's preamp independently. Most beginners do not need this setup.
- Most loopers run on 9V DC center-negative power (same as most standard pedals).
- Use a standard 1/4-inch instrument cable from your chain into the looper's input, and another cable from the looper's output to your amp.
- For most home and practice use, mono (one in, one out) is all you need.
Recording Your First Loop: Step-by-Step
- Plug in and set a clean tone. Distortion makes timing harder to hear on first attempts.
- Set a tempo internally. Count yourself in: 1-2-3-4 in your target tempo.
- Press the record footswitch on beat 1. Start strumming your chord pattern immediately.
- Play one complete phrase — a 4-bar I-IV-V pattern in G works well.
- Press the footswitch again exactly on beat 1 of the next bar to stop recording and start playback. Timing this press accurately is the skill to develop.
- Listen. If the loop clicks or stutters at the transition point, the press was slightly early or late. Stop, clear, and try again.
- Once you have a clean loop, play something over it — a simple melody or chord stab pattern.
- Press the footswitch to overdub and record a second layer. Press once more to re-enter play-only mode.
Common beginner challenge: The glitch at the seam — a click or timing jump where the loop restarts. This is almost always caused by pressing the footswitch a fraction of a beat early or late. Practice pressing exactly on the downbeat. Many players count "1-2-3-STOP" aloud to internalize the exact landing point.
Looping Techniques for Practice and Performance
Solo practice with a looper:
- Record a drone chord and improvise melodies over it. This is the simplest entry point and builds ear training immediately.
- Build a full chord progression (I-IV-V in any key) and practice soloing over all three chords.
- Layer a bass note pattern (lower strings, thumb muted) under a chord loop to hear how bass lines interact with harmony.
- Record a rhythm loop and practice lead technique — string bending, vibrato, slides — over a controlled backing without needing a jam partner.
Performance techniques:
- Build in real time: Start with a single low-string riff, loop it, add a mid-register chord layer, loop it, then play the lead melody over both. This is the Ed Sheeran approach — an entire arrangement built live from one guitar.
- Half-time and double-time: Record a 2-bar loop and play melodic phrases in half-time or double-time to create rhythmic contrast.
- Silent loop trick: Record silence as your base loop to control the exact loop length before playing any notes — useful for locking a precise tempo before committing to notes.
Common Looper Mistakes and How to Avoid Them
| Mistake | Cause | Fix | |---|---|---| | Glitch at loop restart | Footswitch press off-beat | Count measures aloud; press on beat 1 | | Loop too short or too long | Misjudged when to stop recording | Set a fixed phrase length (4 bars) and count | | Losing track of loop position | Not feeling the downbeat | Tap foot to anchor to the loop | | Overdub pile-up | Too many layers | Keep loops to 2-3 layers for clarity | | Loop records silent space | Recorded dead air before playing | Press footswitch, then play immediately |
FAQ
Do I need a looper pedal before other effects pedals? No — a looper is a standalone tool that does not require any other pedals. A looper pedal, a guitar, and an amplifier is all you need to start. As you add other effects (overdrive, reverb, delay), place them before the looper in your signal chain so their sound is captured in the loop. The looper itself just records and plays back whatever signal it receives.
How long should my first loop be? Start with a 2-bar or 4-bar loop in a simple time signature (4/4). A 4-bar loop at 80 BPM lasts approximately 12 seconds — manageable and long enough to practice meaningful musical ideas over. Shorter loops are easier to record cleanly because there are fewer beats between the start and stop presses.
Can I use a looper pedal with acoustic guitar? Yes — any guitar that produces an audio signal works with a looper. For an acoustic guitar, you will need either a guitar with a built-in pickup (plugged directly into the looper) or a microphone running into an audio interface feeding the looper. The most common approach is an acoustic-electric guitar plugged into the looper and then into an acoustic amplifier or PA system.
---
For looper pedals, pedalboard accessories, cables, and more guitar gear, visit professionalgl.com/knowledge-hub.
Browse Professional GL — Strings, Capos, Pedals & More. USA-Designed. Free Shipping on Orders $50+.
Trusted by 1,318+ professional musicians · 4.8 stars · 30-day money-back guarantee · Ships in 1–3 business days.
READY TO UPGRADE YOUR RIG?
Shop Guitar Strings, Capos & Pedals — Free Shipping $50+
USA-designed gear trusted by 1,318+ musicians. Free shipping on orders $50+. 30-day money-back guarantee.
Shop All Guitar Gear — Free Shipping $50+ →